Difference between revisions of "Offerit Mailers"
OfferitRobC (talk | contribs) (→Creating a Mailer) |
OfferitRobC (talk | contribs) (→Sending a Mailer) |
||
| Line 35: | Line 35: | ||
Before you can begin sending out your newly created mailer through [[Offerit]], you must first add a [[Offerit Rules|"SHOW" rule]]. To do so, click on the "Add a new [[Offerit Rules|rule]]" action icon next to your new mailer. On the next page, simply add a "SHOW" type rule for the affiliate you want to send the mailer to, as well as the site whose members you want the mailers to be sent to. For more information about rules in [[Offerit]], please see our [[Offerit Rules]] wiki article. | Before you can begin sending out your newly created mailer through [[Offerit]], you must first add a [[Offerit Rules|"SHOW" rule]]. To do so, click on the "Add a new [[Offerit Rules|rule]]" action icon next to your new mailer. On the next page, simply add a "SHOW" type rule for the affiliate you want to send the mailer to, as well as the site whose members you want the mailers to be sent to. For more information about rules in [[Offerit]], please see our [[Offerit Rules]] wiki article. | ||
| − | [[File: | + | [[File:Admin_Mailer_Rules.png|600px|Adding a rule for your mailer]] |
Once you create a "SHOW" rule for your new mailer, it will be automatically sent out by [[Offerit]] on the publish date that you chose when creating it. | Once you create a "SHOW" rule for your new mailer, it will be automatically sent out by [[Offerit]] on the publish date that you chose when creating it. | ||
Revision as of 13:07, 28 December 2011
The Offerit Mailers Creative type lets you easily create mass e-mails to send out to affiliates and customers, providing a simple way to let them know of any recent news or updates for your offer.
Mailers sent out by Offerit can contain HTML code for greater customization, and can also contain images and .zip files.
Creating a Mailer
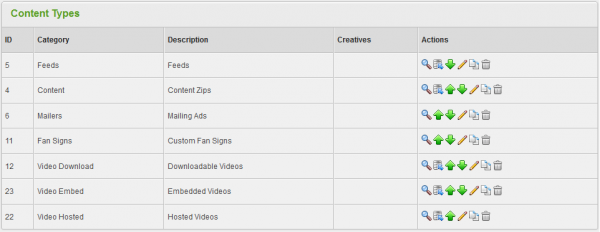
You can create a new mailer in Offerit through the Creatives Admin. To do so, simply go to the Creatives Admin, go to the "Content Types" creative category, and click the "View Creatives" action next to the "Mailers" creative type.
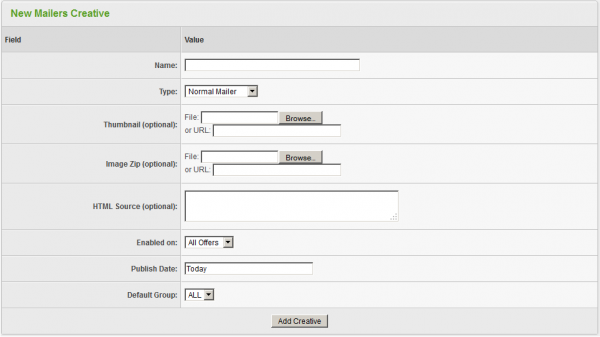
On the next page, you will see a section labeled "New Mailers Creative." The "HTML Source" field in this section is where you can input the body text for your mailer. Offerit mailers support HTML in the body text, so feel free to use as much HTML code as you wish.
Once you have filled in the desired body for your mailer, you can define the other available settings for your banner. These settings include:
- Name - The name of your new mailer.
- Type - Choose if you want to send as a normal mailer, or make sure that it follows CAN-SPAM compliance.
- Thumbnail - Choose a thumbnail image to be included with your mailer (optional).
- Image Zip - Upload images in a .zip file to be included in your mailer (optional).
- Enabled on - Choose members of a site (or all sites) that you want this mailer to be sent to.
- Publish Date - Input what date you want this mailer to be sent out.
- Default Group - Select a creative group to categorize the mailer under.
Once you have defined all of the available fields, click "Add Creative" to add your new Mailer to Offerit.
Your new Mailer will now appear in the "Mailers Creative" table, along with the other available mailers. This table provides you with the creative ID number, name, type, and default group of each mailer.
Sending a Mailer
Before you can begin sending out your newly created mailer through Offerit, you must first add a "SHOW" rule. To do so, click on the "Add a new rule" action icon next to your new mailer. On the next page, simply add a "SHOW" type rule for the affiliate you want to send the mailer to, as well as the site whose members you want the mailers to be sent to. For more information about rules in Offerit, please see our Offerit Rules wiki article.
Once you create a "SHOW" rule for your new mailer, it will be automatically sent out by Offerit on the publish date that you chose when creating it.


