Difference between revisions of "Advertiser Approval"
OfferitRobC (talk | contribs) |
OfferitMegan (talk | contribs) |
||
| Line 23: | Line 23: | ||
[[File:Admin_Approve_Advertiser_Icon.png|Top:Icons of new advertiser; Bottom: Icons of approved advertiser]] | [[File:Admin_Approve_Advertiser_Icon.png|Top:Icons of new advertiser; Bottom: Icons of approved advertiser]] | ||
| + | |||
| + | '''For more information about the ''Change Advertiser Status'' icon, please see our [[Change Advertiser Status]] article.''' | ||
Latest revision as of 16:20, 7 October 2012
When an advertiser signs up to your Offerit install, he/she is "Pending Approval" by default. An advertiser must be approved by an admin before the account will become active.
Approving an Advertiser
To approve an advertiser, navigate to the Advertisers Admin. Newly created advertisers will have an "Approve Advertiser" icon in their actions icon section:
Clicking on this icon will bring you to a page where you can edit the advertiser's current status. You will be greeted with the message:
   This Advertiser is currently marked as "Pending Approval".
       Please use the form below to update their status.
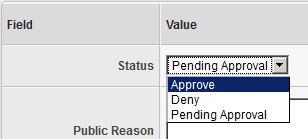
On the bottom of the page, use the drop-down menu to change the advertiser's status from "Pending Approval" to "Approve" if you want to authorize this advertiser, or to "Deny" if you do not want this affiliate to become an advertiser. When you are finished, click the "Set Advertiser Status" button.
After approving an advertiser, the action icon in the Advertiser's Admin that was used to get to the approval page will be replaced with an icon of a gold lock. This icon will still get you back to the status page, should you later choose to edit the advertiser's status.
For more information about the Change Advertiser Status icon, please see our Change Advertiser Status article.
